Supercharge API Integration with NSwagStudio: Generate Clients for C# Effortlessly
Table of Contents
Introduction
In modern software development, APIs play a crucial role in connecting frontend applications with backend services. Writing API clients manually can be tedious and error-prone. This is where NSwagStudio comes in—a powerful tool for generating TypeScript clients, C# clients, and C# controllers from OpenAPI/Swagger definitions, saving time and ensuring consistency.
In this blog, we’ll walk through:
- Setting up NSwagStudio
- Generating TypeScript API clients
- Integrating them into your application
- Types of projects where NSwagStudio is useful
- Prerequisites for using NSwagStudio
- Saving time and improving maintainability with NSwagStudio
Let’s dive in!
Prerequisites for Using NSwagStudio
Before you start using NSwagStudio, ensure you have:
OpenAPI/Swagger Specification:
Your API must have an OpenAPI (formerly Swagger) definition in JSON or YAML format.
.NET SDK (if generating C# clients/controllers):
Install the .NET SDK for integrating with .NET applications.
Node.js (if generating TypeScript clients):
Required for frontend projects using Angular, React, or Vue.
NSwagStudio Installed:
Download it from https://github.com/RicoSuter/NSwag.
Types of Projects Where NSwagStudio is Useful
NSwagStudio can be used in various project types, including:
Frontend Applications
React, Angular, Vue.js: Generate a TypeScript client to make API calls without manually writing request logic.
Backend Applications
ASP.NET Core: Generate a C# client for consuming external APIs seamlessly.
Microservices Architecture: Simplifies communication between services by auto-generating client libraries.
Full-Stack Applications
When working on both frontend and backend, NSwagStudio helps keep API interactions consistent.
API-First Development
If you design APIs before implementation, NSwag can generate controllers, speeding up development.
Installing and Setting Up NSwagStudio
NSwagStudio is a GUI for NSwag, a popular API tooling library. You can install it from: https://github.com/RicoSuter/NSwag
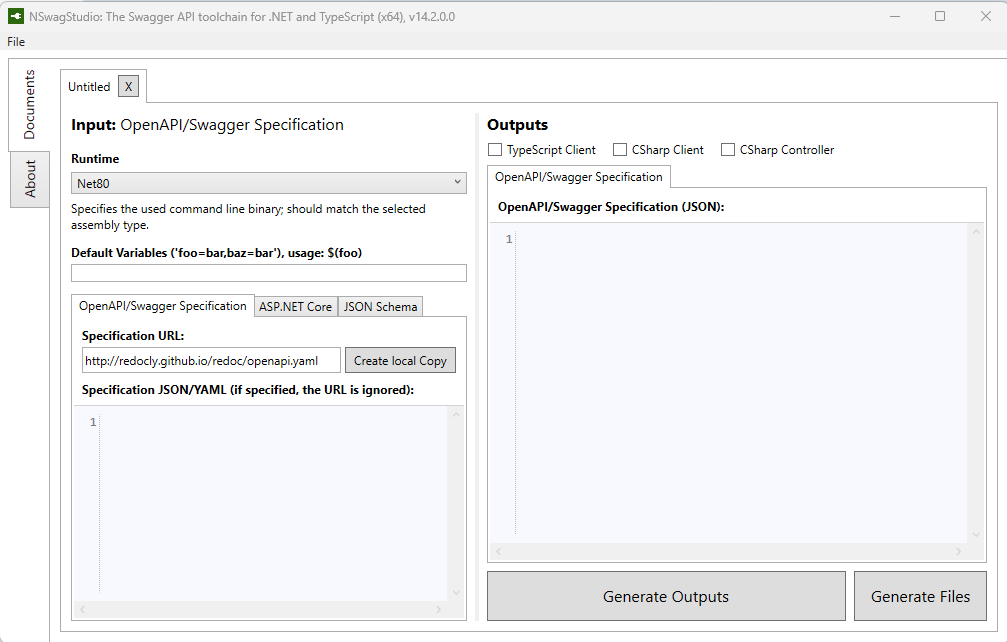
Once installed, launch NSwagStudio, and you’ll see an interface below to load an OpenAPI/Swagger definition and generate clients or controllers.
Generate API Clients & Controllers in Minutes with NSwagStudio
Generating a C# Client
A C# client is useful for backend services that need to communicate with external APIs.
Step 1: Load the OpenAPI Specification
Open NSwagStudio.
In the Swagger Specification URL or File, enter the API definition URL or select a local JSON/YAML file.
Click “Create Local Copy” to parse the API definition.
Step 2: Configure C# Client Generation
- Under Output Type, select C# Client.
- Set the Class Name and Namespace.
- Choose HttpClient as the transport mechanism.
- Enable Use System.Text.Json for modern serialization.
Step 3: Generate and Integrate the C# Client
Click “Generate Outputs” or “Generate Files” and save the file in your .NET project.
Integration Steps in ASP.NET Core Project
- Add the generated C# client to your project.
- Register it as a service in
Program.csorStartup.cs:
builder.Services.AddHttpClient<ApiClient>(client =>
{
    client.BaseAddress = new Uri("https://api.example.com");
});
Inject and use the client in your services or controllers:
public class UserService
{
    private readonly ApiClient _apiClient;

    public UserService(ApiClient apiClient)
    {
        _apiClient = apiClient;
    }

    public async Task FetchUsersAsync()
    {
        var users = await _apiClient.GetUsersAsync();
        Console.WriteLine(users);
    }
}
Generating a C# Controller
If you have an OpenAPI definition but no backend implementation, NSwag can generate controllers for you.
Step 1: Load the OpenAPI Specification
Follow the same steps as before to load the OpenAPI definition.
Step 2: Configure C# Controller Generation
- Select C# Controller under Output Type.
- Set Namespace and Class Name.
- Choose ASP.NET Core Web API as the framework.
- Enable Use System.Text.Json if needed.
Step 3: Generate and Integrate the C# Controller
Click “Generate Outputs” or “Generate Files” and save the file in your ASP.NET Core project.
Step 4: Add Auth Header Using HttpClientFactory (Recommended for .NET Core & .NET 5/6/7+)
Step 4.1 Modify Program.cs (or Startup.cs in older versions)
builder.Services.AddHttpClient<ApiClient>(client =>
{
    client.BaseAddress = new Uri("https://api.example.com/");
})
.ConfigureHttpClient((sp, client) =>
{
    // Optional: dynamic logic from services
})
.AddHttpMessageHandler(() => new AuthHeaderHandler("your-token-here"));
Step 4.2: Create a DelegatingHandler for Adding Auth Header
public class AuthHeaderHandler : DelegatingHandler
{
    private readonly string _token;

    public AuthHeaderHandler(string token)
    {
        _token = token;
    }

    protected override async Task<HttpResponseMessage> SendAsync(HttpRequestMessage request, CancellationToken cancellationToken)
    {
        if (!string.IsNullOrEmpty(_token))
        {
            request.Headers.Authorization = new AuthenticationHeaderValue("Bearer", _token);
        }

        return await base.SendAsync(request, cancellationToken);
    }
}
If You Use an ApiKey Instead of Bearer Token
request.Headers.Add("X-API-KEY", "your-api-key");
Conclusion: Save Time, Reduce Errors, and Automate API Integration
NSwagStudio significantly simplifies API integration by automating client and controller generation. Whether you’re working with TypeScript, C#, or ASP.NET Core, it ensures consistency, saves time, and reduces errors.
By registering generated clients globally with Dependency Injection and following clean integration patterns, you create a maintainable and scalable codebase.
✅ Save development hours
✅ Ensure type safety and consistency
✅ Simplify collaboration between teams
Don’t waste time writing what NSwag can generate in seconds.
Start using NSwagStudio today and bring speed, structure, and sanity to your API development workflow!
👉 If you found this guide helpful, share it with your team – and explore the full potential of automated API tooling.