Supercharge API Integration with NSwagStudio: Generate Clients for Typescript Effortlessly –
Table of Contents
Introduction
In modern software development, APIs play a crucial role in connecting frontend applications with backend services. Writing API clients manually can be tedious and error-prone. This is where NSwagStudio comes in—a powerful tool for generating TypeScript clients, C# clients, and C# controllers from OpenAPI/Swagger definitions, saving time and ensuring consistency.
In this blog, we’ll walk through:
- Setting up NSwagStudio
- Generating TypeScript API clients
- Integrating them into your application
- Types of projects where NSwagStudio is useful
- Prerequisites for using NSwagStudio
- Saving time and improving maintainability with NSwagStudio
Let’s dive in!
Prerequisites for Using NSwagStudio
Before you start using NSwagStudio, ensure you have:
OpenAPI/Swagger Specification:
Your API must have an OpenAPI (formerly Swagger) definition in JSON or YAML format.
.NET SDK (if generating C# clients/controllers):
Install the .NET SDK for integrating with .NET applications.
Node.js (if generating TypeScript clients):
Required for frontend projects using Angular, React, or Vue.
NSwagStudio Installed:
Download it from https://github.com/RicoSuter/NSwag.
Types of Projects Where NSwagStudio is Useful
NSwagStudio can be used in various project types, including:
Frontend Applications
React, Angular, Vue.js: Generate a TypeScript client to make API calls without manually writing request logic.
Backend Applications
ASP.NET Core: Generate a C# client for consuming external APIs seamlessly.
Microservices Architecture: Simplifies communication between services by auto-generating client libraries.
Full-Stack Applications
When working on both frontend and backend, NSwagStudio helps keep API interactions consistent.
API-First Development
If you design APIs before implementation, NSwag can generate controllers, speeding up development.
Installing and Setting Up NSwagStudio
NSwagStudio is a GUI for NSwag, a popular API tooling library. You can install it from: https://github.com/RicoSuter/NSwag
Once installed, launch NSwagStudio, and you’ll see an interface below to load an OpenAPI/Swagger definition and generate clients or controllers.
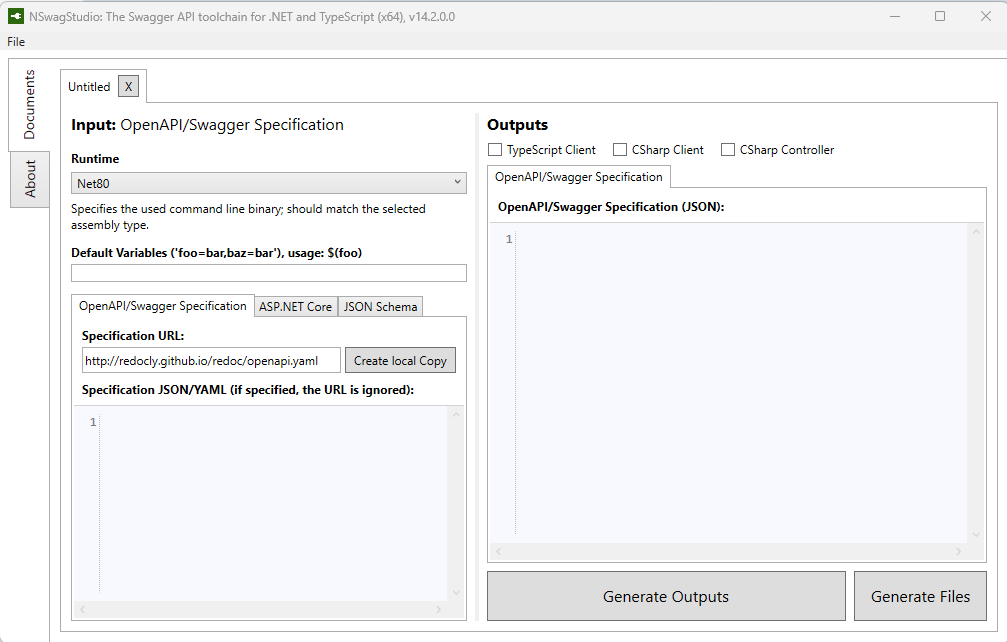
Generate API Clients & Controllers in Minutes with NSwagStudio
Generating a TypeScript Client
A TypeScript client helps frontend applications communicate with a backend API. Here’s how to generate one using NSwagStudio.
Step 1: Load the OpenAPI Specification
- Open NSwagStudio.
- In the Swagger Specification URL or File, enter the API definition URL or select a local JSON/YAML file.
- Click “Create Local Copy“ to parse the API definition.
Step 2: Configure the TypeScript Client Generation
- Under the Output Type, select TypeScript Client.
- Choose the Angular template.
- Set the module system (typically ES6 or System for Angular).
- Set the client class name and HTTP client type if needed.
Step 3: Generate the TypeScript Client
Click “Generate Outputs” or “Generate Files” and save the generated TypeScript file in your project.
Integrate the TypeScript Client into the Angular Project
Step 1: Copy the generated TypeScript file (e.g., client.ts) into your Angular project, inside src/app/services/.
Step 2: Inject the API client into your Angular services
import { Injectable } from '@angular/core';
import { MyApiClient } from '../services/client';

@Injectable({
providedIn: 'root'
})
export class MyService {
constructor(private apiClient: MyApiClient) {}

getData() {
return this.apiClient.getSomething();
}
}
Step 3: Use the service in a component
import { Component, OnInit } from '@angular/core';
import { MyService } from './services/my-service';

@Component({
  selector: 'app-example',
  template: `<p>{{ data | json }}</p>`
})
export class ExampleComponent implements OnInit {
  data: any;

  constructor(private myService: MyService) {}

  ngOnInit() {
    this.myService.getData().subscribe(response => this.data = response);
  }
}
Use Angular HTTP Interceptor (Best Practice for Global Auth Headers)
Let NSwagStudio generate a clean Angular client, and then handle the token injection globally using an Angular HTTP interceptor. This is the most flexible and scalable solution.
Step 1: Create a Token Interceptor in Angular
ng generate service auth/token-interceptor
Step 2: Write Interceptor Code:
// src/app/auth/token-interceptor.service.ts
import { Injectable } from '@angular/core';
import {
  HttpInterceptor,
  HttpRequest,
  HttpHandler,
  HttpEvent
} from '@angular/common/http';
import { Observable } from 'rxjs';

@Injectable()
export class TokenInterceptorService implements HttpInterceptor {
  intercept(req: HttpRequest<any>, next: HttpHandler): Observable<HttpEvent<any>> {
    const token = localStorage.getItem('authToken');  // Or get from AuthService

    let request = req;
    if (token) {
      request = req.clone({
        setHeaders: {
          Authorization: `Bearer ${token}`,
          'X-Custom-Header': 'CustomValue'
        }
      });
    }

    return next.handle(request);
  }
}
Step 3: Register the Interceptor in app.module.ts
import { HTTP_INTERCEPTORS } from '@angular/common/http';
import { TokenInterceptorService } from './auth/token-interceptor.service';

@NgModule({
  providers: [
    {
      provide: HTTP_INTERCEPTORS,
      useClass: TokenInterceptorService,
      multi: true
    }
  ]
})
export class AppModule {}
Conclusion: Save Time, Reduce Errors, and Automate API Integration
NSwagStudio significantly simplifies API integration by automating client and controller generation. Whether you’re working with TypeScript, C#, or ASP.NET Core, it ensures consistency, saves time, and reduces errors. Start using NSwag today to streamline your development workflow!
If you found this guide helpful, share it with your team and start automating your API integrations!